WordPress is a popular content management system that powers millions of websites, and with the help of plugins, it can be transformed into a feature-rich online marketplace.
One such plugin is Dokan, a powerful tool that enables you to create and manage multi-vendor marketplaces within your WordPress site.
Today, I will explore the various aspects of using the Dokan plugin and guide you through the process of setting up and managing your own marketplace.
Installing and Activating the Dokan Plugin
Before we dive into the details of using the Dokan plugin, the first step is to install and activate it on your WordPress website. Here’s a step-by-step guide:
- Accessing the WordPress Dashboard: Log in to your WordPress admin area by appending “/wp-admin” to your domain name (e.g., www.yourwebsite.com/wp-admin).
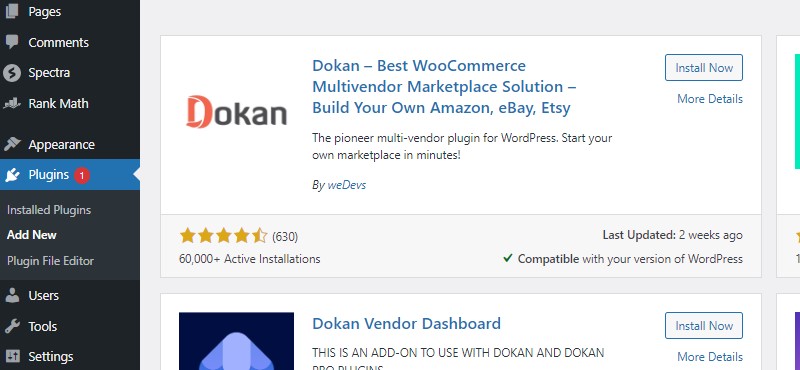
- Navigating to the Plugins Section: Once logged in, locate the “Plugins” tab on the left-hand side of the dashboard and click on it.
- Searching and Installing the Dokan Plugin: In the Plugins section, click on “Add New” and search for “Dokan” in the search bar. Once you find the Dokan plugin, click on “Install Now” and wait for the installation to complete.
- Activating the Dokan Plugin: After installation, click on the “Activate” button to activate the Dokan plugin on your website.
Configuring the Dokan Plugin Settings
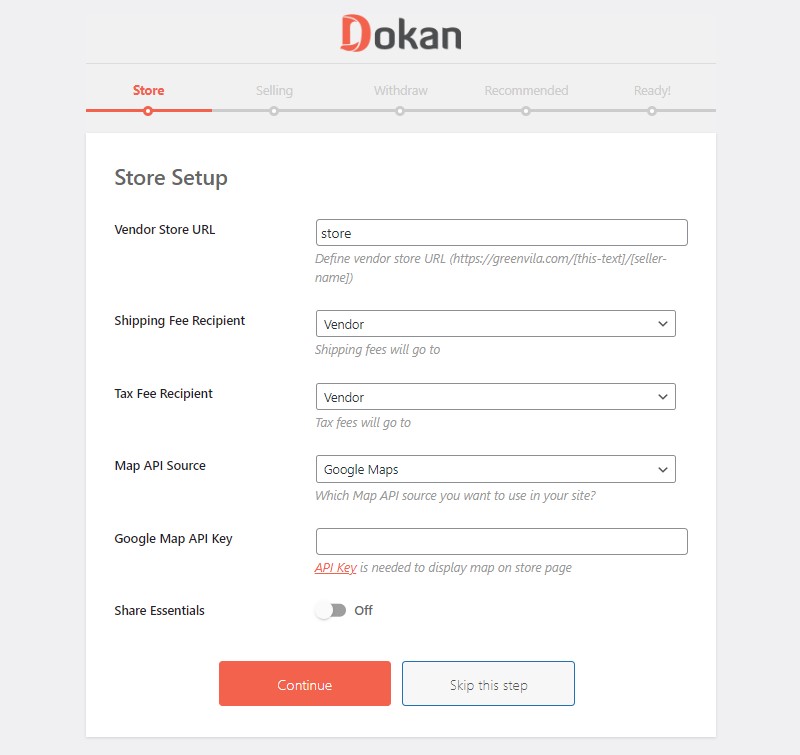
After activating the Dokan plugin, it’s essential to configure its settings to customize the behavior of your marketplace. Let’s explore the key configuration options:
Accessing the Dokan Settings
In the WordPress admin dashboard, navigate to “Dokan” in the left-hand menu, and click on “Settings.”
General Settings
In the General settings tab, you can configure various options related to vendor registration, verification, and store settings. Customize these options based on your marketplace requirements.
- Vendor Registration: Choose whether vendors can register directly or if they need approval from the admin.
- Vendor Verification: Enable verification methods such as email or social media to ensure the authenticity of vendors.
- Store Options: Define the store URL format and choose whether vendors can create their store banners.
Also Read: Is Elementor compatible with Dokan?
Selling Options
The Selling Options tab allows you to configure settings related to product types, selling areas, and vendor commissions.
- Product Types: Select the types of products vendors can sell on your marketplace, such as physical or digital goods.
- Selling Areas: Choose whether vendors can sell their products locally, globally, or both.
- Vendor Commissions: Set up commission rates for vendors based on their sales.
Withdraw Options
The Withdraw options tab enables you to define payment gateways, withdrawal methods, and withdrawal thresholds.
- Payment Gateways: Integrate popular payment gateways to allow vendors to receive payments.
- Withdraw Methods: Specify how vendors can withdraw their earnings, such as bank transfer or PayPal.
- Withdraw Threshold: Set a minimum balance threshold for vendors to initiate withdrawals.
Appearance Settings
Customize the appearance of your marketplace by selecting a theme, configuring colors, and setting the layout.
Email Notifications
Enable or disable various email notifications to keep vendors informed about their store activities, orders, and more.
Creating and Managing Vendor Accounts
With the Dokan plugin, you can easily create and manage vendor accounts within your marketplace. Here’s how:
Vendor Registration Process
Depending on your settings, vendors can either register directly or request approval from the admin. Provide clear instructions on how vendors can register and become a part of your marketplace.
Approving and Verifying Vendors
As an admin, you have the option to manually approve or verify vendor accounts. This step ensures that only legitimate vendors are allowed to sell on your marketplace.
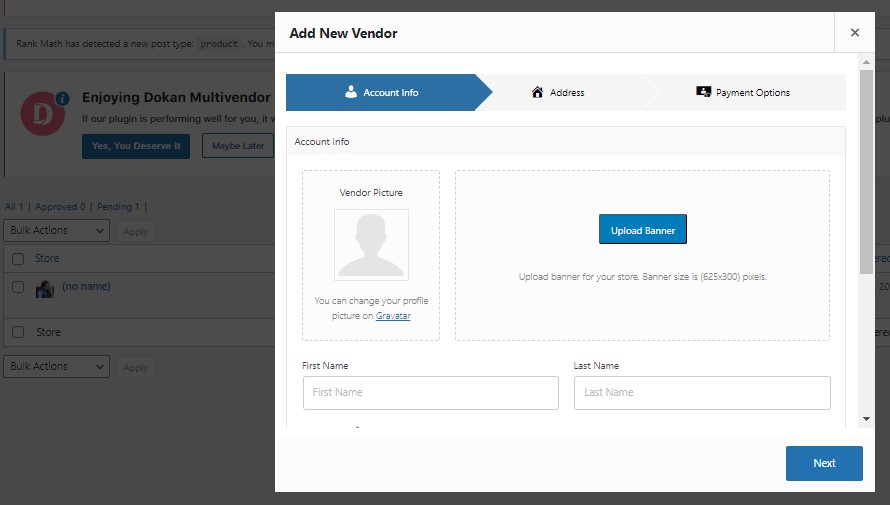
Managing Vendor Accounts
Once vendors are approved, you can manage their accounts efficiently.
- Adding New Vendors: Add new vendors directly from the Dokan admin area by providing their details.
- Editing Vendor Profiles: Edit vendor profiles to update their information, contact details, or make any necessary changes.
- Disabling or Deleting Vendor Accounts: If required, disable or delete vendor accounts in case of policy violations or other reasons.
Managing Products and Orders
As a multi-vendor marketplace, efficiently managing products and orders is crucial. Here are the key aspects you need to consider:
- Adding Products as a Vendor: Vendors can add products to their store by accessing the Dokan vendor dashboard. They can provide product details, descriptions, images, and other necessary information.
- Managing Product Inventory: Vendors can keep track of their product inventory, update stock quantities, and manage variations through the Dokan vendor dashboard.
- Handling Orders and Shipping: Vendors receive notifications for new orders, process them, and update the order status once shipped. They can manage shipping methods, generate labels, and provide tracking information.
- Dealing with Refunds and Returns: Vendors should have clear policies in place for handling refunds and returns. They can communicate with customers through the Dokan vendor dashboard to resolve any issues.
Customizing Vendor Stores
Dokan allows vendors to customize their store appearance and create a unique brand identity. Here’s how they can do it:
- Choosing Store Themes and Layouts: Vendors can select from a range of store themes and layouts to create a visually appealing storefront.
- Customizing Storefront Appearance: Vendors can customize the appearance of their storefront by adding a logo, banners, and background images.
- Adding Store Policies and Information: Vendors can define their store policies, such as shipping and return policies, to provide transparency to customers.
- Setting Up Store Widgets: Vendors can add widgets to their store pages, showcasing featured products, top-rated items, or recent additions.
Enhancing the Dokan Experience with Add-ons
Dokan offers various add-ons that can extend the functionality of your marketplace. Consider installing and configuring these add-ons based on your specific requirements:
- Overview of Dokan Add-ons: Familiarize yourself with the available Dokan add-ons and their features.
- Popular Add-ons and Their Features: Explore popular add-ons such as Dokan Live Chat, Dokan Product Duplicator, and Dokan Geolocation to enhance customer engagement and streamline vendor operations.
- Installing and Configuring Add-ons: Install desired add-ons from the Dokan plugin’s Add-ons section and configure their settings as per your marketplace needs.
Promoting and Growing a Marketplace with Dokan
Creating a successful marketplace requires active promotion and engagement strategies. Here are some tips to help you grow your marketplace with Dokan:
- Marketing Strategies for Vendor Recruitment: Develop marketing campaigns to attract potential vendors to join your marketplace. Highlight the benefits, features, and success stories of your marketplace.
- Encouraging Vendor Engagement: Foster vendor engagement by organizing contests, offering incentives, and providing educational resources to help vendors succeed on your platform.
- Optimizing SEO for Marketplace Stores: Implement SEO best practices to improve the visibility of vendor stores and individual product listings on search engines.
- Leveraging Social Media and Content Marketing: Utilize social media platforms and create valuable content such as blog posts, tutorials, and videos to promote your marketplace and attract customers.
Troubleshooting Common Issues with Dokan
While Dokan is a robust plugin, you may encounter occasional challenges. Here are some common issues and possible solutions:
- Plugin Compatibility Issues: If you experience conflicts with other plugins or themes, ensure that you are using the latest versions and reach out to Dokan support for assistance.
- Payment Gateway Configuration Problems: If vendors face issues with payment gateways, double-check the configuration settings and verify that the chosen payment gateway is compatible with Dokan.
- Storefront Customization Challenges: If vendors encounter difficulties customizing their store appearance, provide them with documentation or direct them to support resources to resolve the issue.
Conclusion
In conclusion, the Dokan plugin empowers you to build a thriving multi-vendor marketplace within your WordPress site. By following the steps outlined in this article, you can install, configure, and manage your marketplace effectively.
With the right marketing strategies and continuous vendor engagement, your marketplace has the potential to grow and succeed. Start exploring the possibilities with Dokan today and create an online marketplace that caters to the needs of both vendors and customers.
Remember, the success of your marketplace depends on consistent effort, regular updates, and providing excellent customer service to drive growth and ensure a positive user experience.
I hope this article has provided you with valuable insights on how to use the Dokan plugin in WordPress. Happy marketplace building!