Moving your website’s content to a new home can be exciting, but the process can feel daunting. Fear not! With the right tools and planning, you can migrate seamlessly, preserving your precious content and maintaining your search engine ranking.
Whether you’re switching platforms, themes, or domains, this guide will equip you with the knowledge and strategies to ensure a smooth transition. So, buckle up and get ready to breathe new life into your online presence!
Backup Your Website
Before making any changes, it is imperative to create a backup of your existing website. This ensures that you can revert to the original state in case anything goes wrong during the migration process. Utilize a reliable backup plugin such as UpdraftPlus or your hosting provider’s backup tools.
Choose a New Theme or Set Up a New WordPress Site
If you are moving to a new theme, choose and install it on your existing WordPress site. Alternatively, if you are moving to an entirely new site or domain, set up WordPress on the new server or hosting provider. Ensure that your new theme or site has the required plugins and features for your content.
Export Content from the Old Site
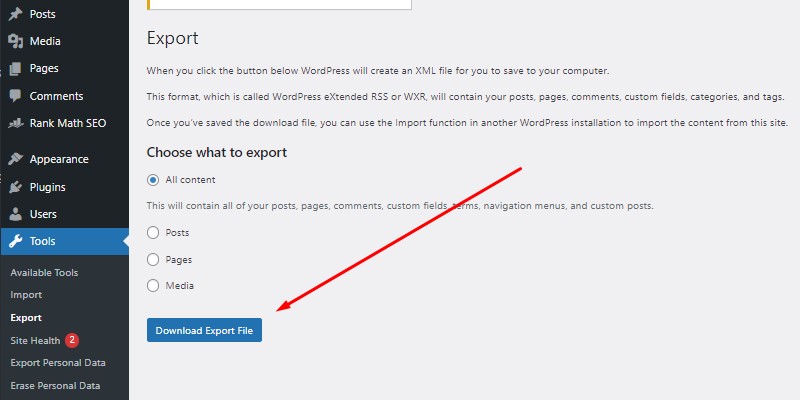
WordPress provides a built-in export tool that allows you to export your content in a standardized XML format. To do this:
Navigate to Tools > Export in the WordPress admin dashboard.
Choose what to export (All content, Posts, Pages, etc.).
Click on the “Download Export File” button.
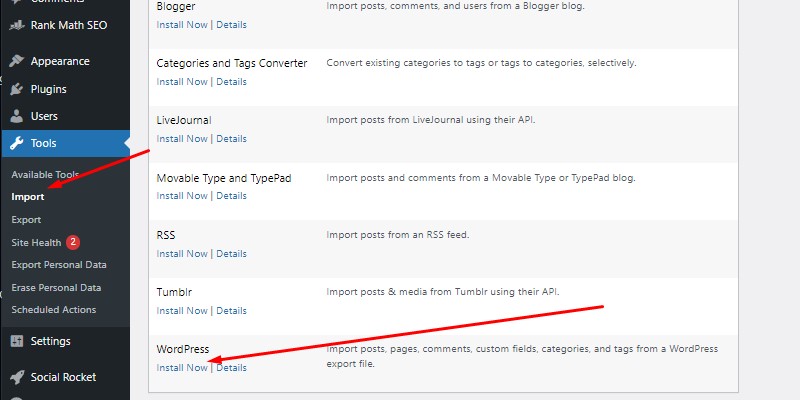
Import Content to the New Site
After exporting your content from the old site, import it into the new one using the following steps:
Navigate to Tools > Import in the WordPress admin dashboard.
Install the WordPress Importer plugin if you haven’t already.
Choose the WordPress export file you previously downloaded.
Map authors to existing users or create new users.
Complete the import process.
Adjust Permalinks and Settings
Update permalink settings and other site-specific configurations on the new site to match the structure of the old site. This ensures that URLs remain consistent, preventing broken links and maintaining search engine optimization (SEO) rankings.
Move Media Files
Copy all media files (images, videos, documents) from the old site to the new one. You can use FTP (File Transfer Protocol) or a file manager provided by your hosting provider to transfer the wp-content/uploads directory. Ensure that the file structure remains intact.
Update Internal Links
After importing content, review your posts and pages for internal links that might still point to the old site. Use a search and replace tool or a plugin like Better Search Replace to update internal links in the database to match the new domain or site structure.
Set Up 301 Redirects
If you are changing your domain, set up 301 redirects from the old URLs to the new ones. This is crucial for maintaining SEO value and ensuring that users and search engines are directed to the correct content. You can implement redirects manually in your .htaccess file or use a redirection plugin.
Check and Update Custom Post Types and Taxonomies
If your old site used custom post types or taxonomies, ensure that these are registered and configured correctly on the new site. Update any custom queries or templates that might be affected by changes in post types or taxonomies.
Review and Test
Thoroughly review your new site to ensure that all content has been transferred accurately, and the design and functionality match your expectations. Test the site’s performance, functionality, and responsiveness across various devices and browsers.
Update DNS Settings (if changing domain)
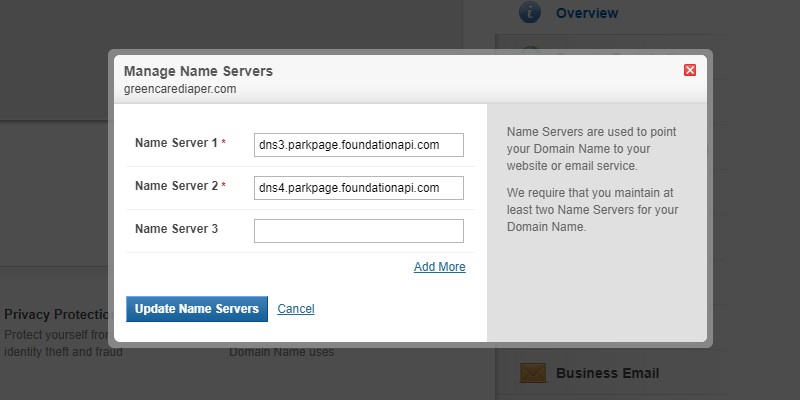
If you are moving to a new domain, update your DNS settings to point to the new hosting provider. This step might take some time to propagate, so be patient and monitor the process.
To update DNS settings after changing your domain:
- Log in to your domain registrar’s website.
- Navigate to the DNS management section.
- Locate the DNS records for your domain.
- Update the “A” records to point to the IP address of your new hosting provider.
- Update the “MX” records if you use custom email addresses.
- Save your changes.
- DNS propagation may take up to 48 hours; monitor the process.
- Test your new domain to ensure it resolves correctly.
Inform Stakeholders
If your website has regular visitors or subscribers, inform them about the migration beforehand. Provide information on any changes, such as a new domain or updated features, to ensure a seamless experience for your audience.
Monitor and Troubleshoot
Keep an eye on your site after the migration. Monitor for any broken links, missing media files, or unexpected issues. If you encounter problems, refer to your backup and troubleshoot accordingly.
Conclusion
Moving content to a new site or theme in WordPress requires careful planning and execution to ensure a seamless transition. By following the comprehensive guide outlined above, you can successfully migrate your content while preserving SEO rankings, user experience, and site functionality.
Remember to take the necessary precautions, such as creating backups and testing thoroughly, to mitigate any potential issues during the migration process. With proper preparation and attention to detail, you can achieve a smooth and successful transition to your new WordPress site or theme.